Reporting with Apache Zeppelin and MongoDB Compass
This tutorial is only valid for Simflofy 3.X
Apache Zeppelin is a notebook web application that allows the user to perform data analysis through the use of interpreters. Queries and code can be run inline to produce tables and charts.
MongoDB Compass is a tool that provides a simple interface for MongoDB. It allows the user to test and export aggregations, which are more complex data operations.
Users can create quick and easy charts and reports based on audited data and mappings in Simflofy's database. This tutorial will give a brief walk through on basic setup and give some example queries.
Step 1: Get Apache Zeppelin
As of writing, 0.8.2 is the stable release of Apache Zeppelin. It can be downloaded here. You will need to scroll down to get to the correct version, as the preview is not stable for our purposes.
It is recommended that you download the full version of the software, as Docker and Net Installation can lead to complications.
Once downloaded, unpack the zip file. Zeppelin runs at port 8080 by default. If you need to change this, check here for reference on how.
Step 2: Install The MongoDB Interpreter
This version of Zeppelin does not include an interpreter for MongoDB. It should be automatically included in the 0.9.0 version.The interpreter can be downloaded here. A GitHub account may be required. Once downloaded, change the file from .zip to .jar. In the Zeppelin folder go to the interpreter folder and create a folder named mongodb. Drop the jar file there.
Once you are happy with the configuration, open a command line and navigate to bin folder in the Zeppelin folder and execute the command ./zeppelin-daemon.sh start or .\zeppelin-daemon.cmd start (for windows) command using the highest privileges available to you (sudo for Nix systems if possible).

Step 3: Configuring the MongoDB Interpreter
Open a browser and go to localhost:8080 (or whatever port you configured). On the Zeppelin landing page go to the Interpreter page.
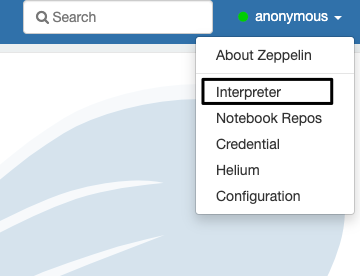
This page may already have a mongodb interpreter entry, scroll down to find it. If not, continue on with the next step to Create an interpreter. If so, skip to the step to fill out the listed properties.
On the interpreter page click +Create in the top right corner. Then:
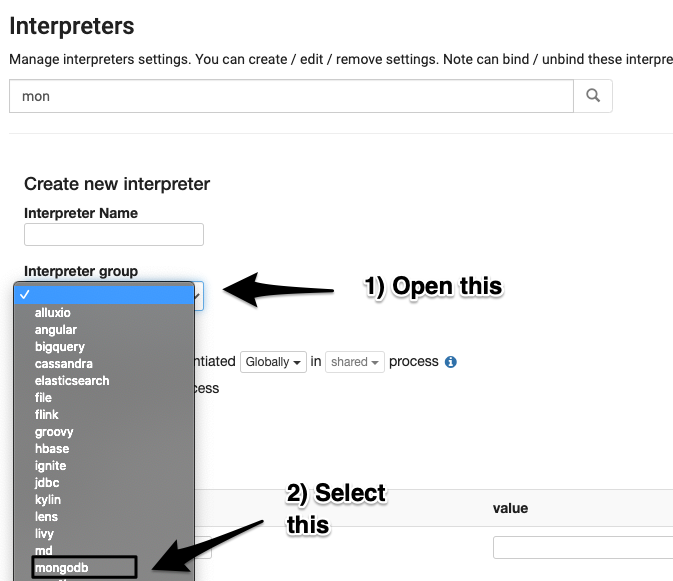
Name the interpreter mongodb. Add the following properties:
The included values are the default values to use if you followed the basic installation instructions.
Parameter : Default value : Description
mongo.shell.path: mongo : Mongo shell pathmongo.shell.command.timeout: 60000 : Mongo command timeout (Number)mongo.shell.command.table.limit: 1000 : Limit of documents displayed in a table (Number)mongo.server.database: simflofy : Simflofy database namemongo.server.host: localhost : Host of the MongDB servermongo.server.port: 27017 : Port of the MongDB server (Number)mongo.server.username: simflofy : Username for authenticationmongo.server.password: simflofy : Password for authenticationmongo.server.authentdatabase: admin : Database used for authentication
Click Save, then OK
Step 4: Create a Notebook
Under the Notebook dropdown in the top left corner, click +Create new note.
Add the name you want for your notebook. Select mongodb from the default interpreter dropdown list.
In the top right corner you should see a small gear. Click it and make sure the mongodb interpreter is bound to the notebook. It will be at the bottom if it was just added and at the top if it is currently the default.
Enter %mongodb in the note (or the name you supplied for the interpreter).
You can now run queries or javascript as if you were using the mongo shell.
Ending them with .table() will produce the result as a table and will allow the use of graph creations depending on
the results. We will do an example of this next.
Step 5: The PII Job
This example will be based off a job from the filesystem to a reporting output connector. The only task included is the PII Detection Task with default properties. The Mappings are as follows:
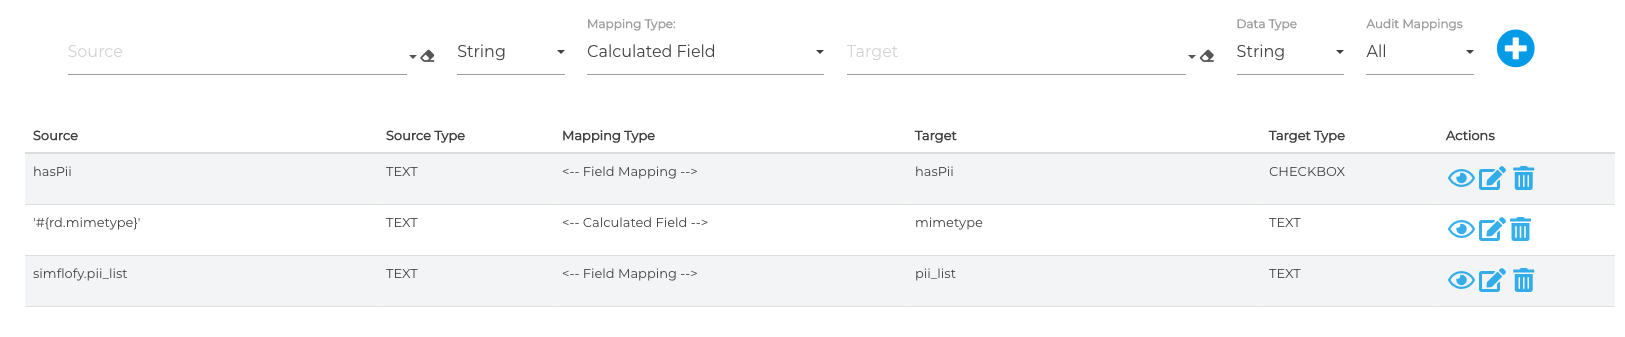
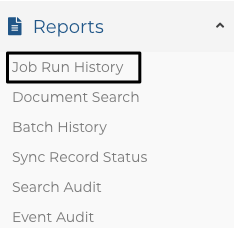
Note that Audit Mappings is set to All. Alternatively you can set this dropdown to Select and click on the eye icon to the right of each mapping. Once the job is run we can retrieve the Job Run ID
by clicking on Job Run History under Reports. Copy and paste the Job Run ID for the job that was just run, as you will need it for your query.
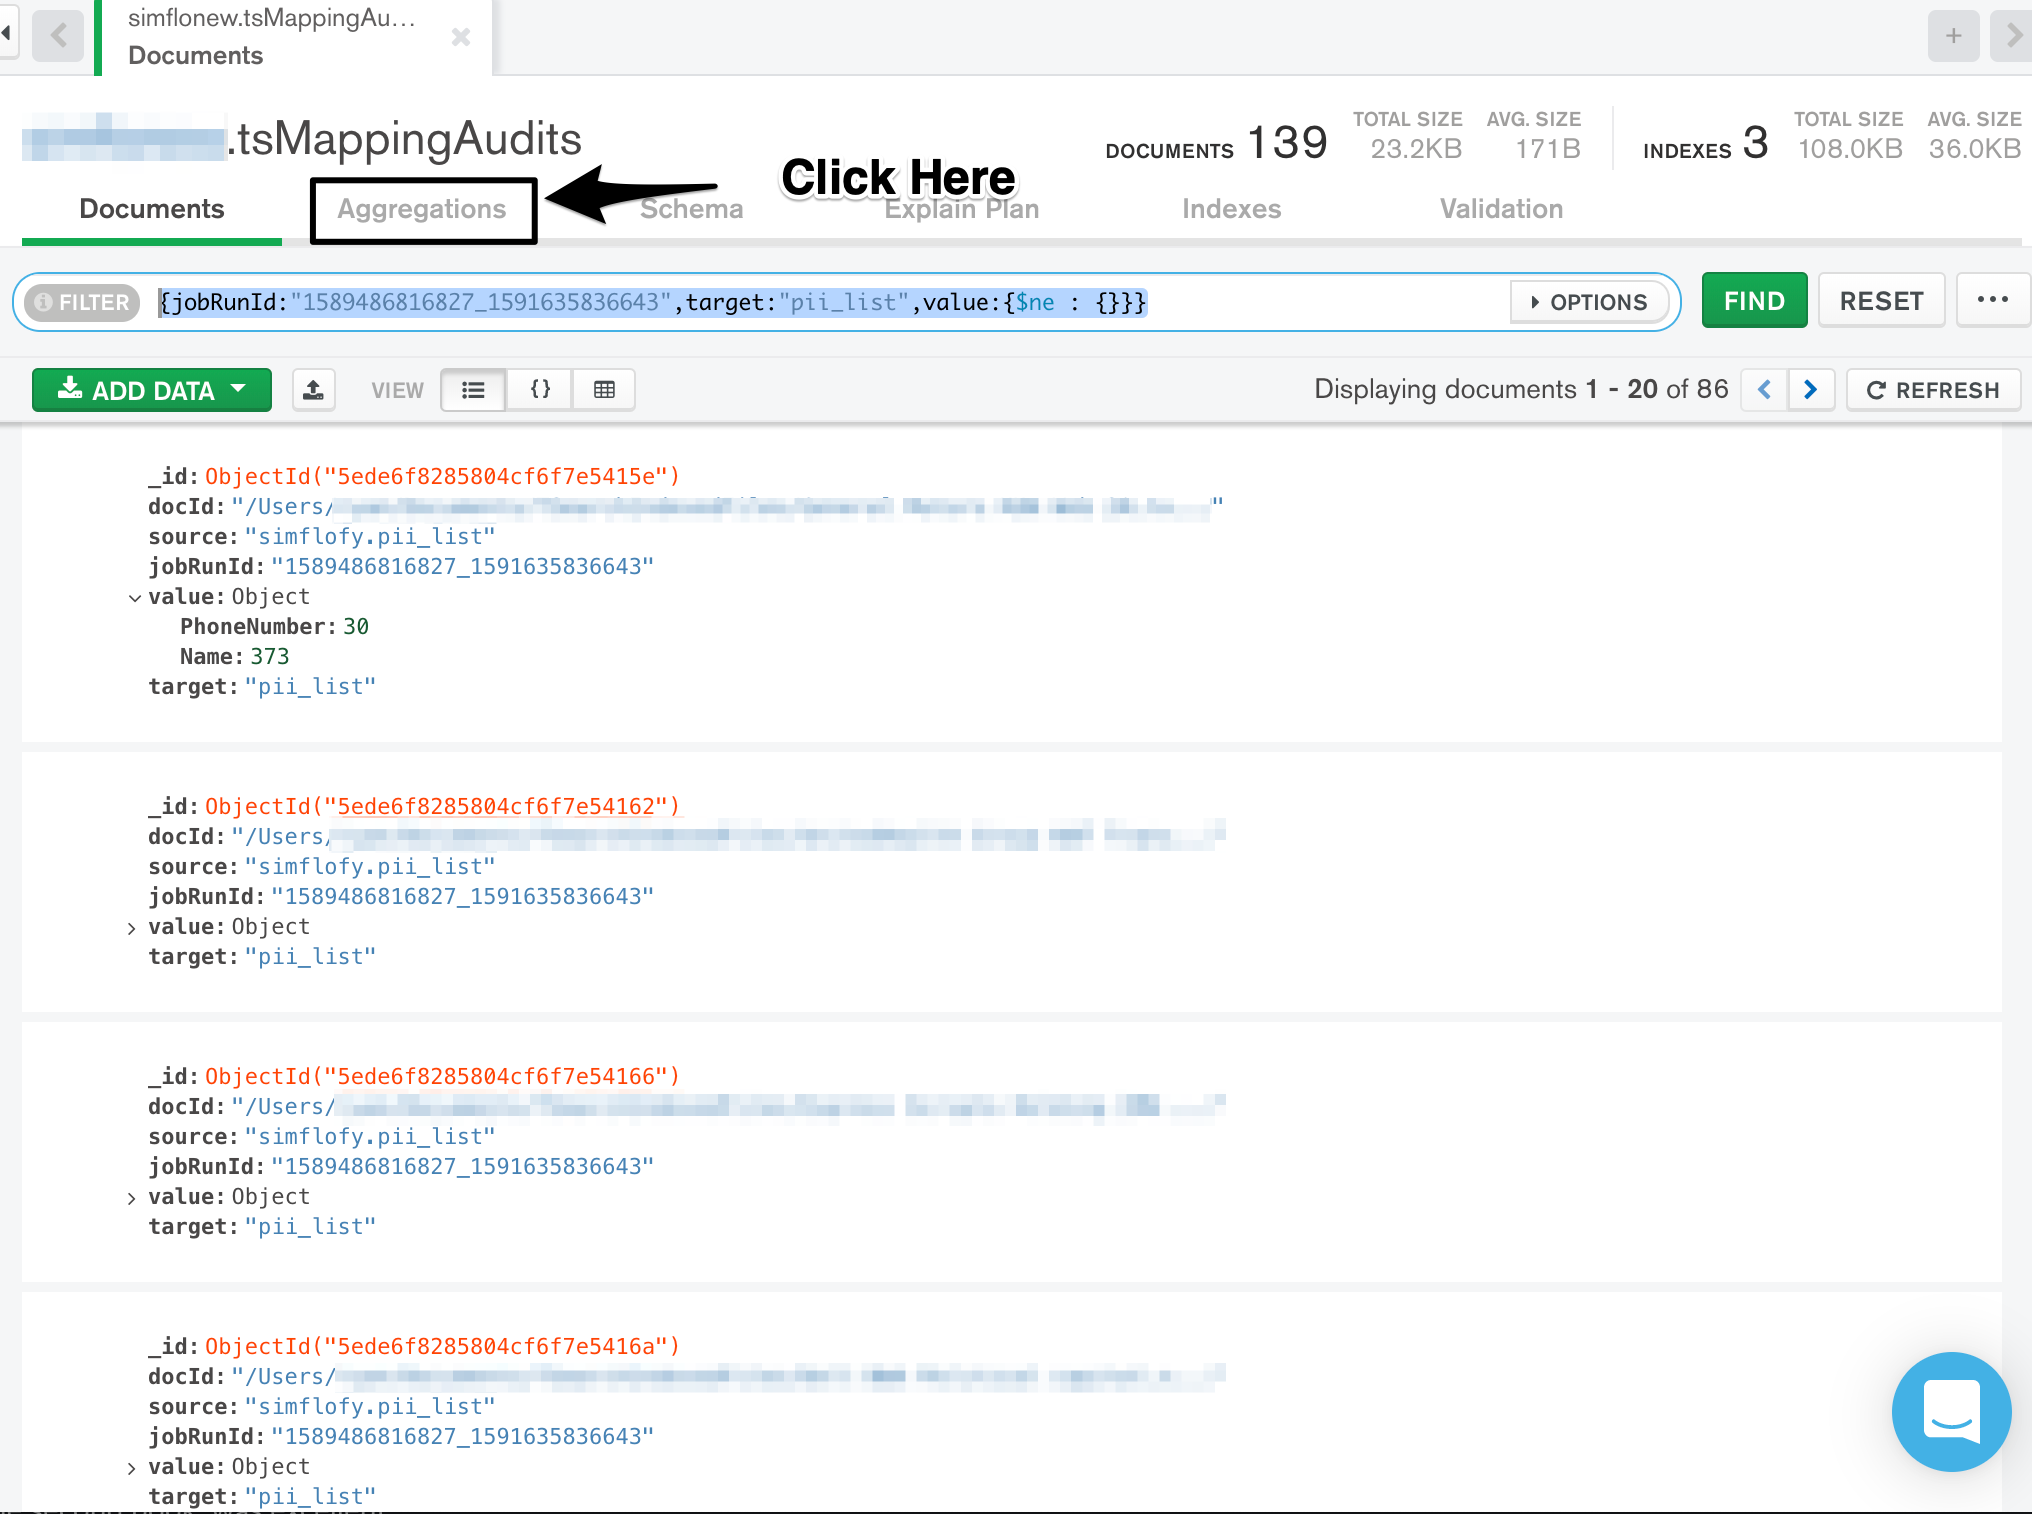
Step 6: Figuring out your query with Mongo Compass
We will assume you were able to start Mongo Compass and connect to your local database instance. Under the list of collections double-click on tsMappingAudits. All mapping audits are stored here as individual documents with their key being the Job Run ID. If we want to see all audited mappings for the runs which had PII we can do it one of two ways.
Option 1)
{
  jobRunId:"<your job run id>",//This is your job run id
  target:"pii_list",//This is the target field from the mappings
  value:{$ne : {}}//$ne means "Not Equal". {} is an empty document.
}
This will select all documents in the job run for whom the pii_list (declared in the mapping) is not equal to an empty document.
Option 2)
{
  jobRunId:"<your job run id>",//This is your job run id
  target:"hasPii",//This is the target field from the mappings
  value:true
}
The task will also add a boolean (true/false) value to the document for a simple check if PII was detected.
And example of a returned document looks like this
{
  "_id": {
    "$oid": "5ede6f8285804cf6f7e5415e"
  },
  "docId": "/Users/name/Documents/DemoFiles/General Motors HUN Web 20.txt",
  "source": "simflofy.pii_list",
  "jobRunId": "1589486816827_1591635836643",
  "value": {
    "PhoneNumber": 30,
    "Name": 373
  },
  "target": "pii_list"
}
As you can see, the value of the PII List is another document (which may clarify Option 1 a bit). This particular document has 30 Phone Numbers and 373 Names. Querying a nested field is slightly different, in that
you must include the key where the document lives. So, in this case, in order to get names, the query would need to be value.Name. This will come up later when calculating the data.
From here, we will need an aggregation to compile the data into a useful form. Information on aggregations can be found here. They are essentially a pipeline of composable operations.
Thankfully, Compass has an easy way to test and export aggregations.
You will come to a screen with some documents listed in the top right. There is also a link to documentation about aggregations in the left column.
The left column are the operations, and the right column is a sample of the returned documents from that operation, which will be sent to the next step.
In the case of our test documents, the only types of PII are Phone Number and Name. The PII Scanner might be useful in determining the types of PII in these documents.
First, click the dropdown and select $match. Copy your query from the options before into the box. Documents should show up in the right column. Now click Add Stage.
We will now add a $group operation to compile all the data we need down to
a single document.
The query for this is:
{
  _id: null,//This means "count all documents passed to this step"
  names: {  //Assigns a field name
    $sum: "$value.Name" //The $ is required for this operation. Sums all Name fields in the document "value".
  },
  phone:{
    $sum : "$value.PhoneNumber"
  }
}
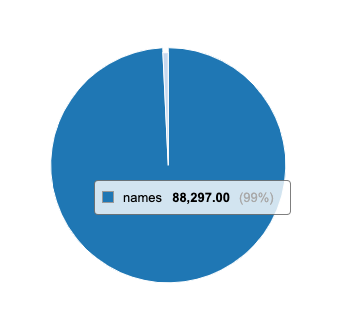
This returns:
{
    _id:null
    names:88297
    phone:676
}
Step 7: Export your query
Zeppelin requires a fully formed query to retrieve information. So, we'll need to export the full aggregation.

This will open a popup. Your full query will be under My Pipeline. Click the green copy button.
Step 8: Graph your query in Zeppelin
Back in your notebook, if not already there, type %mongodb
This tells Zeppelin you're going to enter a query.
On the next line type: db.tsMappingAudits.aggregate().table()
The .table() tells Zeppelin you would like it to process the results into a
dataset that can be charted.
Paste your query in between the parentheses of aggregate. Now click Run.

You should see a simple return of a table with data similar to what you saw in Compass.
From here, click on the Pie Chart logo beneath where you wrote your query and click Settings

You should see three columns: keys, groups, and values. You should also see the names of your fields from the $group step above these columns.
Drags those fields into the values' column to create a pie chart of the data.
Related Articles:
PII Detection and Reporting
Simflofy Reports