Setting Up An MIP Incremental Scheduled Job using Sharepoint to Alfresco With Differing Timezones
This tutorial will detail the steps taken to set up an incremental job that runs on a scheduler. This job's repository and output have differing timezones. In this example Sharepoint will be used as the repository and will be set to GMT 0:00. The output will be Alfresco set up on a server running in EST. If you are using other connectors, skip the Setting Up Connectors section and see the set-up instruction for the connectors you are using.
Setting Up Connectors
- Creating the Sharepoint Authentication Connector Example
- Use the SharePoint REST page to determine which type of Authentication to use
- Under Connection > Authentication and select the type of authentication you picked.
- Fill in the fields as described by the SharePoint REST page
- If using OAUth: Click Authenticate.
- For standard OAuth, you will be redirected to a sharepoint page. Click Trust It:
- For Azure OAuth, the fields should populate themselves.
- Click Save.
- Creating the Sharepoint Repository Connector Example
- In Connections > Integrations click Create Integration Connection
- Select SharePoint REST Connector.
- Set your Authentication Connection to be the authentication connector you set up in step 1.
- Click Save.
- Creating the Sharepoint REST Content Services Connector Example
- In Connections > Content Service click Create New Content Service Connection
- On the following page, under Type select SharePoint (REST)'.
- My sites name is sites/Dev. The list name isDocuments'.
- Finally, I am using my SharePoint authentication connection I created previously as the Authentication Connection.
- In your Alfresco TCS admin page, ensure that this content services connector is registered as a content store through your Alfresco Global Properties.
4 . Creating the Alfresco Authentication Connector Example
- In Connections > Authentication Connections
- I have clicked Create New AuthenticationConnection and made a new connector with the type Alfresco WebscriptAuthentication Connector.
- My username and passwords are the credentials of an Alfresco account with admin privileges.
- My server URL is https://(servername)/alfresco/service.
- My shared path is /Shared/demo , but this can be set to what you need. Ensure that Create Content URL Always is checked.
- Other settings have been left as default.
- Click Save.
5 . Creating the Alfresco Output Connector
- In Connections > OutputConnections
- Click Create New Authentication Connection and make a new connector with the type Alfresco Output Connector.
- Set your authentication connection to be the connector you used in the previous step.
- Click Save.
6 . Creating the Job Mapping
- In Integration > Job Mappings click Create New Job Mapping.
- Import the following mappings:
{"mappings":[{"sourceType":"TEXT","watch":"false","mappingType":"CALCULATED_FIELD","targetType":"TEXT","source":"'#{rd.fileName}'","position":0,"target":"cmis:name"},{"sourceType":"TEXT","watch":"false","mappingType":"ASPECT_MAPPING","targetType":"TEXT","source":"Document","position":0,"target":"cm:storeSelector"},{"sourceType":"TEXT","watch":"false","mappingType":"CALCULATED_FIELD","targetType":"TEXT","source":"'#{rd.simflofyContentServiceConnector}'","position":0,"target":"cm:storeName"}]}
- Click Save.
Creating the Scheduled Job
- Go to Integration > List Jobs and click Create New Job
- Set your repository and output connector (in this example that would be your Sharepoint and Alfresco connectors, respectively)
- Set your repository content service connector to be the SharePoint Online content service connector created previously
- I am first going to make this job a Simple Migration so I can integrate up the initial files that I want
- By default, an Incremental Migration will set the job from and job to times to be from 1 year ago to now, which may not be what you want
- To select the start time and end time that you want click the Advanced Options dropdown
- Since my repository time zone is GMT 0:00 I will set Repository Time Zone to be GMT (GMT) (GMT0:00)
- My output is eastern, so I will set my Output Time Zone to be America/New_York (ET) (GMT-5:00)
- Uncheck Include Binaries
- Go over to the Mappings tab
- Set the job mappings you created earlier
- Click Save and Run the job and ensure it integrated the files you wanted
- Then edit the job and change it to be an Incremental Migration
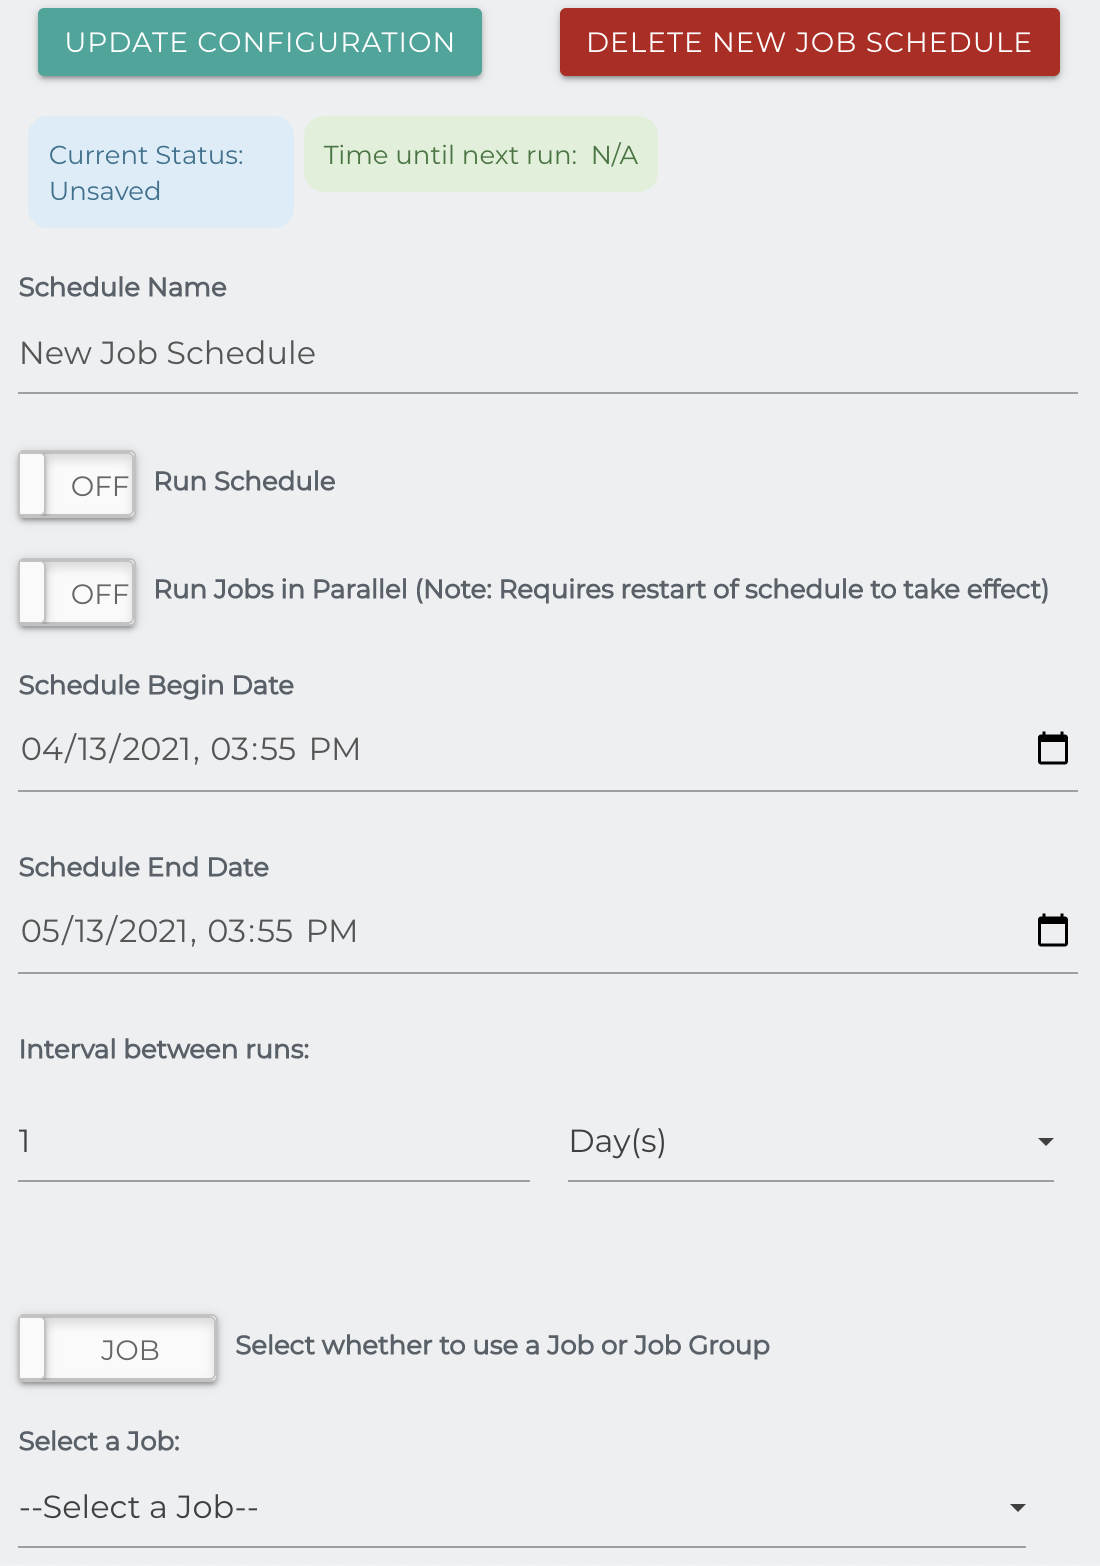
Creating the Scheduler
- In Integration > Schedule Jobs type in the name of your new schedule and click Add Job Schedule.
- Your schedule begin date should be set to the time you want the schedule to start being active.
- The end date being the time you want the scheduler to no longer run jobs.
- Your interval between runs is the period of time between your schedule running your job again.
- In the Select a Job dropdown select the job you made in the previous step.
- Check Run Schedule to enable the job.
- Click Update Configuration.
- At this point when you add new files or modify files in Sharepoint, they will be integrated to Alfresco at the scheduled interval times.
Related Articles:
Schedule Jobs
Simflofy Job Mappings
Integration Tutorials
Setting Up Simflofy Connections