SharePoint REST
Upload Size Limit
The SharePoint REST API has a hard 2 GB limit on uploads. There is currently no way to circumvent this limit.
Authentication Connection
There are currently three methods of authentication for the SharePointREST Connector.
SharePoint REST Azure AD Connector
Allowing Custom Apps in SharePoint
Custom App Authentication
This step is only required if you created your O365 tenant after the year 2019. Microsoft disabled custom apps by default, so there is a series of steps needed to turn them on and allow authentication using tokens. This will require the user of Microsoft PowerShell.
1. Install-Module -Name Microsoft.Online.SharePoint.PowerShell
2. $adminUPN="<the full email address of a SharePoint administrator account, example: jdoe@contosotoycompany.onmicrosoft.com>"
3. $orgName="<name of your Office 365 organization, example: contosotoycompany>"
4. $userCredential = Get-Credential -UserName $adminUPN -Message "Type the password."
5. Connect-SPOService -Url https://$orgName-admin.sharepoint.com -Credential $userCredential
6. set-spotenant -DisableCustomAppAuthentication $false
Creating an APP in SharePoint
- Go to
https://**tenant**.sharepoint.com/_layouts/15/appregnew.aspxwhere tenant is your organization
Tenant Permissions
If you only wish to register your app for a single tenant site, go to its specific appregnew site.
https://**tenant**.sharepoint.com/sites/**tenatSite**/_layouts/15/appregnew.aspx
- Click Generate for Client ID and Client Secret
- Name the app whatever you wish. Simflofy will work fine.
- For app domain use. The host name for wherever Simflofy is running. If running locally, this can be localhost.
- No redirect URI is needed.
- Click Create
- Make note of your Client ID and Client Secret.
.png)
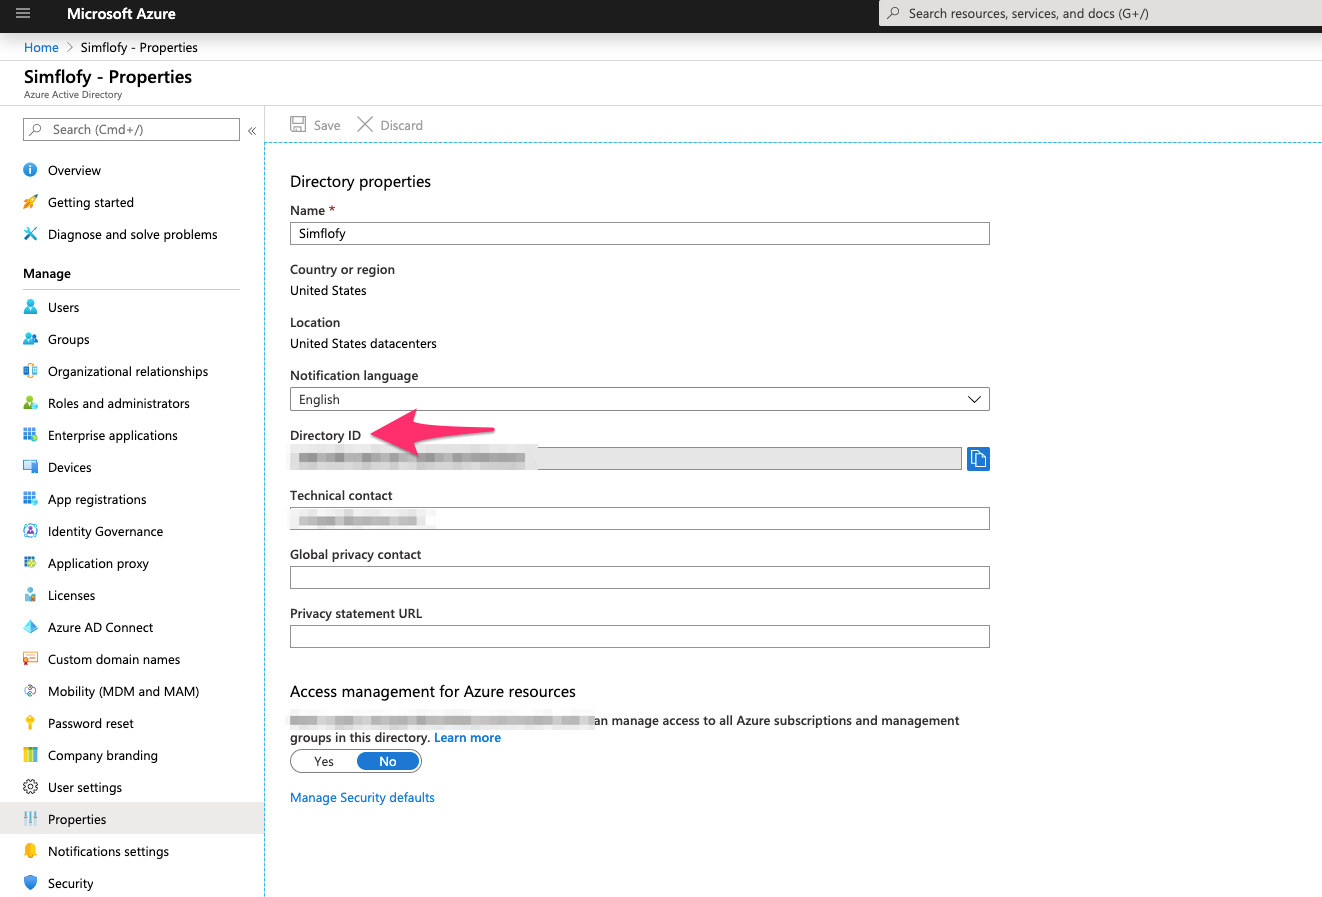
Retrieve Azure Active Directory ID
- Go to portal.azure.com-> azure active directory -> Properties (id)
- Retrieve the Directory ID.
Setting App Permissions
- You may still need to set further permissions for your app in order for it to read/write content.
- In order to do this, go to https://tenant.sharepoint.com/_layouts/15/appinv.aspx
Tenant Permissions
If you registered your app on a tenant site, go to the following instead:
https://**tenant**.sharepoint.com/sites/**tenatSite**/_layouts/15/appinv.aspx
- Set App ID to your apps Client ID and hit "Lookup". The form should populate with your information.
- For a full list of app permissions, scopes, and rights, see the following reference: Add in Permissions In Sharepoint.
- It is strongly suggested you read through the referenced document to determine the permission level that is acceptable and needed for your organization.
- All permission requests take the form:
warning
This request cannot contain formatting of any kind or the permissions will not be set
    <AppPermissionRequests AllowAppOnlyPolicy="true">
    <AppPermissionRequest Scope="http://sharepoint/content/sitecollection/web" Right="FullControl"/>
    </AppPermissionRequests>
Tenant sites, ones not linked directly to the team page, so /sites/Test,will require you to perform this process for them as well. In this case, using the SiteCollection scope.
- Once you have decided on your Scope and Right, input the request into the Permissions Request XML box and click Create. You should see the following.
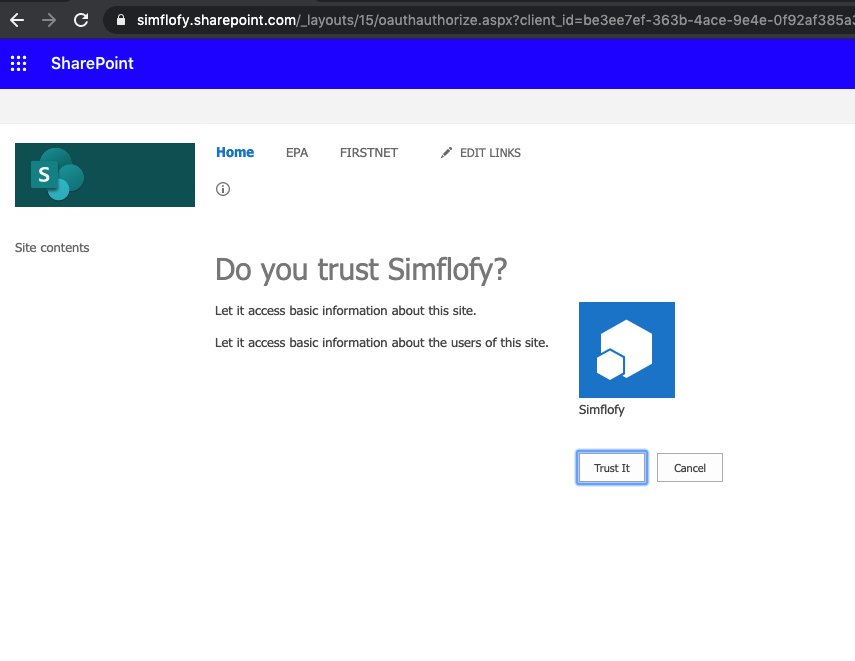
- Select Trust It
- You can check whether your permissions were applied by looking for your app name listed here:
- https://tenant.sharepoint.com/_layouts/15/appprincipals.aspx?Scope=Web
SharePoint REST OAuth Connector
The SharePoint REST OAuth Connector uses a standard OAuth flow through SharePoint's rest apis.
warning
This authentication method is more complicated than using the Azure AD Auth Connection We recommend using the Azure AD Connection unless use of OAuth redirects are a strict requirement.
Requirements:
- Simflofy must be running with SSL (https://). See Tomcat SSL
Allowing Custom Apps in SharePoint
Custom App Authentication
This step is only required if you created your O365 tenant after the year 2019. Microsoft disabled custom apps by default, so there is a series of steps needed to turn them on and allow authentication using tokens. This will require the user of Microsoft PowerShell.
1. Install-Module -Name Microsoft.Online.SharePoint.PowerShell
2. $adminUPN="<the full email address of a SharePoint administrator account, example: jdoe@contosotoycompany.onmicrosoft.com>"
3. $orgName="<name of your Office 365 organization, example: contosotoycompany>"
4. $userCredential = Get-Credential -UserName $adminUPN -Message "Type the password."
5. Connect-SPOService -Url https://$orgName-admin.sharepoint.com -Credential $userCredential
6. set-spotenant -DisableCustomAppAuthentication $false
Creating an APP in SharePoint
- Go to
https://**tenant**.sharepoint.com/_layouts/15/appregnew.aspxwhere tenant is your organization
Tenant Permissions
If you only wish to register your app for a single tenant site, go to its specific appregnew site.
https://**tenant**.sharepoint.com/sites/**tenatSite**/_layouts/15/appregnew.aspx
- Click Generate for Client ID and Client Secret
- Name the app whatever you wish. Simflofy will work fine.
- For app domain use. The host name for wherever Simflofy is running. If running locally, this can be localhost.
- For redirect uri use https://(SimflofyAddress)/authconn/oauthcb.
- Click Create
- Make note of your Client ID and Client Secret.
Setting App Permissions
- You will still need to set further permissions for your app in order for it to read/write content.
- In order to do this go to https://tenant.sharepoint.com/_layouts/15/appinv.aspx
Tenant Permissions
If you registered your app on a tenant site, go to the following instead:
https://**tenant**.sharepoint.com/sites/**tenatSite**/_layouts/15/appinv.aspx
- Set App ID to your apps Client ID and hit Lookup. The form should populate with your information.
- For a full list of app permissions, see the following reference: Add in Permissions In Sharepoint.
- It is strongly suggested you read through the referenced document to determine the permission level that is acceptable and needed for you organization.
- The scopes and rights can be found in the preceding document.
warning
This request cannot contain formatting of any kind or the permissions will not be set
    <AppPermissionRequests AllowAppOnlyPolicy="true">
    <AppPermissionRequest Scope="http://sharepoint/content/sitecollection/web" Right="FullControl"/>
    </AppPermissionRequests>
- Once you have decided on your Scope and Right, input the request into the Permissions Request XML box and click "Create". A screen like the following should appear again.
- Select Trust It
- You can check whether your permissions were applied by looking for your app name listed here:
- https://tenant.sharepoint.com/_layouts/15/appprincipals.aspx?Scope=Web
SharePoint REST Auth Connector
The basic authentication method for Office 365. The user needs to supply their username and password.
- The tenant url is required: ie https://[tenant].sharepoint.com.
- If the instance is secured with an ADFS server, simply click the checkbox at the bottom.
Key Records Management Functionalities will not work with this authentication method. For RM, use OAuth
Creating and Authentication Connection in Simflofy
- Go to Connectors > Authentication Connections
- Create a new Connection and selectSharePoint REST OAuthConnector from the dropdown. It will be after the standard SharePoint REST Auth connector. Make sure you select the right one.
OAuth Information
- SharePoint Online Service URL: Full URL to connect to your SharePoint Online Service. The tenant url is required: ie https://tenant.sharepoint.com.
- Access Scope (Optional): Scope is a mechanism in OAuth 2.0 to limit an application's access to a user's account
- Tenant Path: Due to how Simflofy performs connection checks, this field is required if your connection is only registered to a single tenant site. Otherwise, the check will give a false negative.
- Client ID: Provided to you during your App registration (more info)
- Client Secret: Provided to you during your App registration (more info)
- Access Token: Click Authenticate before saving to populate the Access token
- Refresh Token: Click Authenticate before saving to populate the Access token
Proxy Information Tab:This tab is for if you're connecting through a proxy, and is optional.
- ProxyURL: The URL of the proxy server
- ProxyPort: The port of the proxy server
- ProxyUsername: (Optional) The username to authenticate to the proxy server
- ProxyPassword: (Optional) The password to authenticate to the proxy server
Connecting in Simflofy
- Input the required information and hit "Authenticate".
- For the Azure AD Connector, the tokens should automatically populate. Click Save.
- You should see the "trust it" page again.
- Click Trust It. You should return to your Auth Connection page, with all the appropriate fields populated.
- Click Save.
Discovery Connector
Instance configuration
- Name:Unique Name for the Discovery Connection to identify it in the UI.
- Authentication Connection: The Authentication connection to the SharePoint Server you want to discover
- Ignore Types:Comma delimited list of types to ignore. Note that you can have regex as well. So to ignore all types with "workflow" in the name, you would enter(.)workflow(.) into the ignore types textbox.
- Site path - Path to the Site you want to discover(i.e. /mysite/mysubsite). Enter a single forward slash / for root site (this will discover your entire site).Required to run discovery on tenant sites (ie, [sharepointURL]/sites/mysite)
Once configured click save and then on the Run link to execute the discovery. This could take quite a while depending on what site you decided to start at. For instance, a system with a thousand sites and 10 thousand libraries will take a while.
Integration Connection
The connection can operate in both repo and output modes. In repo mode, it will retrieve list items and all of their relevant metadata from a list or library on the specified site.
In output mode, the connection will write content and assign the mapped content type (from type mappings), or simply leave the new list item as a Document
Field Mappings
A note on SharePoint REST Mappings. The only field type that needs the target type set for a mapping are Date fields. Numbers and text are parsed automatically from Strings.
Integration Connection Configuration
- Connection Name: This is a unique name given to the connector instance upon creation.
- Description: A description of the connector to help identify it better.
- Authentication Connection: One of the SharePoint REST Authentication Connections
Job Configuration
- Repository
- Output Specification
- Site Name : The site from which this connector is collecting data.
- List Title : Which is the Shared Documents' folder in your site. It will crawl these lists in sequence. Takes a comma delimited list of list names. If left blank it will default to "Documents",
- Get Document Versions : Will gather document versions and binaries (if include binaries is selected).This option will reduce processing speed of documents.
- Get Folder Metadata : As the name suggests, will gather folder metadata for processing/output.
- Get Security Information : Enables the gathering of security information from the site. If this option is selected,the selected level of security will be applied to each document.
- Security : Level of security information to add to the documents. This option does nothing if the above option is unchecked.
- Currently, the security information only consists of the name of the security group and its principal ID. The depth of security should not alter performance. All security information is gathered at the beginning of the integration and is cached to be applied later.
- Site Name : The name of the sub site or tenant site where the data will be placed.
- List Title : The name of the library where the data will be placed.
- Output Folder Path : The output folder inside the Library. The folder will be created if it does not exist.
Content Service Connection
Connection Configuration
Site Name : The site from which this connector is collecting data.
- Site Url : [tenant].simflofy.com/sites/test, Value: sites/Test
- Site Url:[tenant].sharepoint.com/MySite, Value: MySite
List Title :The name of the library the connection will interact with. Connections can only support one library. The default value, if left blank, will be the Documents library, which will write to the Shared Documents' folder of your site.
If you're going to be testing REST endpoints, you will need a REST client to make the DELETE and POST calls.
Refer to this tutorial to set up Postman.
cUrl calls will also work, but the Postman interface makes it all much easier.
Retrieving Ids using Content Services
All Endpoints for Sharepoint will use the universally unique identifier (guid) for id parameters. There are a few ways to retrieve ids for items in a libraries.
- Use the idbypath endpoint in content services - Probably the quickest solution. The endpoint takes fileName and folderPath. You do not need to include the root folder path for the library. If the document is in the root folder of the library (Shared Documents in Documents, for example), then pass the value "/".
Example: If we are trying to retrieve Shared Documents/test/folder/mydoc.txt in the Documents library, the call would look like this:
http://localhost:8081/simflofy-admin/api/repo/spo/idbypath?folderPath=test/folder&fileName=mydoc.txt
And should retrieve the following response:
{
    "success": true,
    "results": "ad7c1901-eb58-42f9-a9eb-38210896adcd"
}
- Use the rootfolderid and folder items endpoint.
The rootfolderid endpoint should produce the following for a connections with site "sites/Dev" and no list name configured
http://localhost:8081/simflofy-admin/api/repo/spo/rootfolderid
{
    "success": true,
    "results": {
        "folderPath": "/sites/Dev/Shared Documents",
        "folderId": "8c06f41e-3c5b-4252-a8b1-1bb14d1989ec",
        "folderName": "Shared Documents"
      }
}
With that id, we can then iterate over the items in that folder using the folderitems endpoint
http://localhost:8081/simflofy-admin/api/repo/spo/folderitems?id=8c06f41e-3c5b-4252-a8b1-1bb14d1989ec
{
    "success": true,
    "results": {
        "025f91b6-b923-44b4-aa54-8ded345cee9f": {
            "ETag": "025F91B6-B923-44B4-AA54-8DED345CEE9F",
            "createdDate": "2020-12-01T18:08:35Z",
            "description": "",
            "itemPath": "/sites/Dev/Shared Documents/Dell_BWA_Political_capital.xlsx",
            "length": "124089",
            "modifiedDate": "2020-12-01T18:08:35Z",
            "type": "Document",
            "versionCount": "2"
        },
        "159f65fa-0351-4fb3-bfe9-cff99831488a": {
            "ETag": "159F65FA-0351-4FB3-BFE9-CFF99831488A",
            "createdDate": "2020-12-01T18:08:46Z",
            "description": "",
            "itemPath": "/sites/Dev/Shared Documents/Liberty_Mutual_Insurance_Group_SWE_Mobile.pdf",
            "length": "22919",
            "modifiedDate": "2020-12-01T18:08:46Z",
            "type": "Document",
            "versionCount": "2"
        },
        "ae2df7c9-8a70-491b-8beb-bd8fb5e0004e": {
            "ETag": "AE2DF7C9-8A70-491B-8BEB-BD8FB5E0004E",
            "createdDate": "2020-12-01T18:08:56Z",
            "description": "",
            "itemPath": "/sites/Dev/Shared Documents/UnitedHealth_Group_MNG_Client-centric.pdf",
            "length": "370839",
            "modifiedDate": "2020-12-01T18:08:56Z",
            "type": "Document",
            "versionCount": "2"
        },
        "d352ecef-ead2-4e5f-b105-4aa70d48bf5d": {
            "createdDate": "2021-09-02T18:22:59Z",
            "itemCount": "1",
            "itemPath": "/sites/Dev/Shared Documents/MyTest",
            "modifiedDate": "2021-09-03T17:26:25Z",
            "type": "Folder"
        }
    }
}
From here you can further iterate through the children of the MyTest folder or grab the document id for later use.
Managing Permissions with Content Services
The API supports GET, POST, and DELETE calls.
All the endpoints take the "id" parameter. See above for how to correctly structure them.
Read Permissions (ACLs)
Request:
GET/repo/(connectorid)/acls?id=(id)
Description:
Retrieve a list of acls in the format ["User1:Permission1","User2:Permission2"]. The value
of users can be parsed by users in the POST and DELETE methods.
Path Parameters:
connectorid: The connector id of your content service connector
Query Parameters:
id: The repository id in the compound format used for SharePoint Online.See above.
GET repo/spo/acls?id=ad7c1901-eb58-42f9-a9eb-38210896adcd
isList: (optional, 3.1.2+): If this argument is included and set to true, supplying the list name instead of a document guid will retrieve the permissions on the list
Returns:
{
  "results": [ "Dev Owners:Full Control", "Dev Visitors:Read", "Dev Members:Edit" ],
  "success": true
}
Example With CURL
curl -u admin:admin "localhost:8081/simflofy-admin/api/repo/spo/acls?id=ad7c1901-eb58-42f9-a9eb-38210896adcd" | json_pp
Write Permissions (ACLs)
Request:
POST /repo/(connectorid)/acls?id=(id)&acls=(acls)
Description:
Adds acls to the selected document. If you wish to change an existing permission, use the DELETE method first.
Path Parameters:
connectorid: The connector id of your content service connector
Query Parameters:
id: The repository id in the compound format used for SharePoint Online. See above.
acls: A JSON Object in the format
{"Group1":"Permission1","Group2":"Permission2"}
addToGroup: (Special, 3.1.2+), see the following example
Adding users to a group (3.1.2+)
If you want to add users to a group that's already defined, you can do so by including the addToGroup flag, set to
true and leaving the id field as an empty value (note, it must still be included). In this case the format of the body should be:
{
  "Group1": ["user1@tenant.onmicrosoft.com", "user2@tenant.onmicrosoft.com"],
  "Group2": ["user3@tenant.onmicrosoft.com"]
}
Example from Postman
POST repo/spo/acls?id=ad7c1901-eb58-42f9-a9eb-38210896adcd&acls={"Dev Members":"Full Control"}
Returns:
{
  "results": [ "Dev Owners:Full Control", "Dev Visitors:Read", "Dev Members:Full Control"],
  "success": true
}
Example With CURL
curl -u admin:admin -X POST "localhost:8081/simflofy-admin/api/repo/spo/acls?id=ad7c1901-eb58-42f9-a9eb-38210896adcd&acls={%22Dev%20Members%22:%22Full%20Control%22}" | json_pp
Delete Permissions (ACLs)
Request:
DELETE /repo/(connectorid)/acls?id=(id)&aclId=(aclId)
Description:
Removes a group from the permission list of the targeted document.
Path Parameters:
connectorid :The connector id of your content service connector
Query Parameters:
id:The repository id in the compound format used for SharePoint Online.See above.
aclId:Comma delimited list of names to remove
DELETE repo/spo/acls?id=ad7c1901-eb58-42f9-a9eb-38210896adcd&aclId=Dev Visitors
Returns:
{ "success": true }
A Subsequent GET call would produce
{
  "results": ["Dev Owners:Full Control", "Dev Members:Edit"],
  "success": true
}
Example With CURL
curl -u admin:admin -X DELETE "localhost:8081/simflofy-admin/api/repo/spo/acls?id=ad7c1901-eb58-42f9-a9eb-38210896adcd&aclId=Dev%20Visitors" | json_pp
For this example the file is located at:
/Shared Documents/ATandT TUV Mashup.txt
The Content Service Connection with the connector id spo is the one from the image at the beginning of the page
with Site Name set to sites/Dev and List Name set to Documents(the default alias for the Shared Documents' folder in SharePoint)
The Simflofy instance is located at:
http://localhost:8081/simflofy-admin
First, we'll need the id of the document, so we'll use ID by path. Since the document is in the root folder we'll pass "/" as the folder path.
http://localhost:8081/simflofy-admin/api/repo/spo/idbypath?folderPath=/&fileName=ATandT TUV Mashup.txt
{
    "success": true,
    "results": "ad7c1923-eb58-42f9-a9eb-3821089aadcd"
}
So, the call
http://localhost:8081/simflofy-admin/repo/spo/acls?id=ad7c1923-eb58-42f9-a9eb-3821089aadcd
Produces:
{
    "results": ["Dev Owners:Full Control", "Dev Visitors:Read", "Dev Members:Edit"],
    "success":true
}
If we want to replace Dev Members "Edit" permission with the "Full Control" permission first we call DELETE on Dev Members:
http://localhost:8081/simflofy-admin/repo/spo/acls?id=ad7c1923-eb58-42f9-a9eb-3821089aadcd&aclId=Dev Members
Then we would call the POST to add the new permission for Dev Members:
http://localhost:8081/simflofy-admin/api/repo/spo/acls?id=ad7c1923-eb58-42f9-a9eb-3821089aadcd&acls={"Dev Members":"Full Control"}
API Endpoints
The Simflofy SharePoint Online API makes use of several SharePoint REST API Endpoints. When setting up your connector, verify that your service account or credentialed user has the proper rights to make calls to the endpoints listed below.
API_FOLDER_PATH = _api/web/folders/
API_FOLDER_BY_URL_POST = _api/web/GetFolderByServerRelativePath(decodedurl='%s')/Files/add(url='%s',overwrite=true)
API_FOLDER_BY_URL_GET_FILES =_api/web/GetFolderByServerRelativePath(decodedurl='%s')/Files
API_FOLDER_BY_URL_GET_FOLDERS =_api/web/GetFolderByServerRelativePath(decodedurl='%s')/Folders
API_FOLDER_BY_URL_GET_ALL =_api/web/GetFolderByServerRelativePath(decodedurl='%s')?$expand=Files,Folders
API_FOLDER_DELETE = _api/Web/GetFolderByServerRelativePath(decodedurl='%s')
API_FILE_GET_PROPS = _api/Web/GetFileByServerRelativePath(decodedurl='%s')/Properties
API_FILE_GET_CONTENT = _api/Web/GetFileByServerRelativePath(decodedurl='%s')/$value
API_FILE_DELETE = _api/Web/GetFileByServerRelativePath(decodedurl='%s')
API_FILE_CHECKIN_MAJOR = _api/Web/GetFileByServerRelativePath(decodedurl='%s')/CheckIn(comment='%s',checkintype=1)
API_FILE_CHECKIN_MINOR = _api/Web/GetFileByServerRelativePath(decodedurl='%s')/CheckIn(comment='%s',checkintype=0)
API_FILE_CHECKOUT = _api/Web/GetFileByServerRelativePath(decodedurl='%s')/CheckOut()
API_FILE_GET_VERSIONS = _api/Web/GetFileByServerRelativePath(decodedurl='%s')?$expand=Versions
API_GET_SITES = _api/Web/webs
API_GET_AVAILABLE = _api/Web/AvailableContentTypes
API_LISTS_BY_TITLE = _api/Web/lists/GetByTitle('%s')
API_CONTENT_TYPES = _api/web/contenttypes
API_MAKE_SITE = _api/web/webinfos/add
API_MAKE_NAV_NODE = _api/web/Navigation/TopNavigationbar
API_MAKE_LISTS = _api/Web/lists
API_ADD_CONTENT_TYPE = _api/Web/lists/GetByTitle('%s')/ContentTypes/AddAvailableContentType
API_GET_LIST_TEMPLATES = _api/web/listtemplates